Wednesday

Giraffe-Giraffe

This  4 part project involves direct drawing, cutting, gluing, painting, and print making as well as collage techniques and coloring.

Giraffe-Giraffe connects to the art work of primitive painter Henri Rousseau as well as classroom themes of animals and imagination.

Part I: How to draw a Giraffe head

Part II: Blue skies and white clouds (color mixing and values)

Part III: Cut out the head and neck and add pattern/design


Part IV: Putting it all together.


Here is the art blog that I found the base for this lesson thanks, Georgetown Elementary
http://josettebrouwer.edublogs.org/2011/01/15/second-grade-giraffes/comment-page-1/#comment-631
Sunset sky

Inspired by the color wheel this 2 part projects connects to several art standards and can be designed to support numerous classroom themes.


Part I: I can paint the sky-using watercolors to create a sunset sky

Part I: Silhouettes, landscape at sunset-torn black paper arrange to create a dessert landscape. Scissors used for details after the basic forms are created.


Bear with me

Fourth Graders love this direct drawing project because it is fun and flexible while allowing for lots of creative expression.


This is a two part project that can be directed to connect to language arts and skill building. Because it involves a direct drawing element, all students have the same tools to feel successful and then they are free to develop their own personal expression through, color, details and background. I use white glue on black or dark brown paper, but first have students practice on sketch paper with pencils, working on ear placement and facial proportions. Have students put their name on the back of the black paper before they start drawing with glue.  Allow at least 48 hours for glue to dry. Add color, patterns and details with chalk pastels and set with fixative.


Stylized Landscape

This 2 part, direct drawing project combines formal line and a graphic design sensibility with expressive color. Perfect connection to Fauvism and other 20th century Modernist Art movements.

Part I students are introduced to the parts of a landspace by looking at famous examples. Vocabulary to explore: foreground, background, middle ground, composition and balance. Through step by step direct drawing on sketch paper students create a landscape-one tree on a hill. After students are comfortable with the composition they are given black paper and a white glue bottle. Using the glue as the line, they recreate their landscape. Papers are set aside to dry.


Part II-Introducing color into the drawing. Student explore drawing and shading with chalk pastels. Discuss the use of expressive color and connect to Fauvism. Return glue drawings and review. Compare and contrast realistic and imaginary color choices. After the color is applied all works will be sprayed with a fixative as preservation measure.


How to Doodle


6th grade students were introduced to the world of doodling and Zen doodling. Using a series of handouts and direct drawing prompts they created a dozen different textures, patterns and or designs in their sketchbooks. This exercise was used as a warm-up for several classes and provides a foundation for the next couple of projects. I found that so many of our students either don't know how to doodle or are afraid they will doodle "wrong" or make a mistake. I shared with them that doodling is about freedom, no right or wrong...but there is a time and  place so don't doodle during your math lesson (or at least don't get caught).

copy of hand-out found on line used
to inspire students

Zen Doodling/Zentangle is more formal and structured approach to the doodle but their site provides a lot of fun creative direct drawing prompts and promotes the healthy meditative benefits of doodling . Check it out or google zentangle to see some youtube tutorials on the craft


Saturday

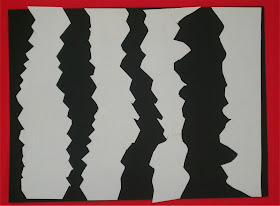
Black and White Stripes


a collection of class projects
Students cut out paper forming a black and white zebra stripe pattern. Look at images of zebras and discuss how the pattern works to protect the heard.
This is a great introduction to scissor skills and builds on pattern development. You can use regular scissors or "crazy" scissors with a decorative cutting edge. The white paper is the paper the students cut, and it is 1/3 smaller than the base black paper. Students must cut at least 5 stripes. I have also used this project as the base for an African shield project.  Vocabulary to introduce: negative and positive space, rhythm and pattern


Sunday

Paper Mache Sugar Skulls

This two part project, builds on previous knowledge of the human skeleton and day of the dead while introducing new ideas through a hands on sculpture based project. Creating a base skull form from newspaper and masking tape, students then tear and add paper mache strips to refine the shape. A hook or wire is added with a label for the student's name. Skulls are left to dry 4-5 days then are spray painted (by the instructor) with a white base. Using sharpie markers, tissue paper, sequins and yarn students complete the transformation into Sugar Skulls.Connects to social studies standards and cultural awareness.


Discovery Day

Discovery Day, 5th grade students were allowed to select one object from a tray placed on each table. Then they were given the following guidelines: Each table would work as a team (designated by their color tray of object) all teams were given the same basic contruction supplies, small Styrofoam base, cut bit of a straw, yarn, paper clip, 6 inches of tape, small paper plate...
They had 10/15 minutes to create a group sculpture, give it a title and a brief description such as where would this be displayed, how big would it be, does it do anything...?
Each sculpture had be able to be transported to the front table on two plastic spatulas. All members of the group had to be involved in the presentation.


The Impossible House

This lesson combines a project I found on Pinterest (will post asap) and my own approach connecting to source materials. Using a variety of provided shapes as patterns, students must design a house in which at least 4 of the main elements do not touch-making it impossible.

These pictures were drawn on black paper using metallic crayons and color pencils as well as construction paper crayons and gel markers. We looked at Aboriginal art work and the creations by the artist, Hunderwasser.

Connects to imagination 3rd grade language arts standard and because of its open creative format allows all students with a varying creative skills to feel successful.

Summer leaves into Fall leaves


Kindergarten artists transform a lovely green (pre-cut, older student can use a leaf pattern to cut out their own base shape) summer leaf through the art of collage into a colorful fall leaf. Through this process students are introduced to the technique of paper tearing, over-lapping and how to use white glue (and keep it on the art work area or in the bowl). We use small plastic dishes of glue and inexpensive dollar tree brushes. I find sitting the bowls in coffee filters works well as a protective skirt helps with clean up. No scissors are used and each students can use a few pieces of gold shiny paper as an accent. This is handed out last.

Mr. Bones Imagine and Observation


imaginary
human skeleton
This is a wonderful two part art project for 2nd grade. It  introduces the human skeleton, body proportion, and builds on imagination by using observation skills.
Part I imagine a human skeleton. Discuss where you "find" skeletons, review the basic body parts (I like to use the song head and shoulders knees and toes). Give the students a limited time to draw their very own imaginary human skeleton using pencil and pre-cut white paper. Remind artists that no two imaginary skeletons will look alike.


Part II using handouts, table images and a large skeleton model (we call ours Mr. Bones) explore the bones of the human skeleton. How many bones do adults have compared to babies. Give students black pre-cut construction paper and white color pencils or crayons. Using a simplified direct drawing approach draw the entire skeleton together. Remind students about body proportion (hands in relation to hips...) proper names for bones and how the skeleton works.

This project can be expanded to challenge many grades. Display both drawings together and compare and contrast the imagined Mr. Bones with the observed Mr. Bones.

Tuesday

This is me!

Kindergarten self portrait project with Ms. Robbin's class.